This week, I tried to keep pace with everything the garden was throwing at us! There were pickles to be made, raspberries to be preserved, green beans, beets, peaches that had to be eaten. What can I say, it’s a tough job and somebody’s got to do it!
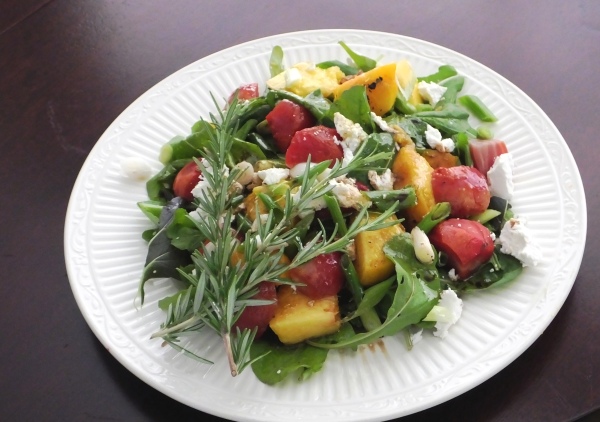
First up is a wonderful, refreshing Peach and Roasted Beet Salad. Yup – you read that right!
The recipe is inspired by one I found on our local co-ops website, PCC Natural Markets.
Ingredients
- 10 to 12 small beets: red, yellow and Chiogga
- 3 green onions, sliced in 1/4′ slices on the diagonal
- 2 yellow peaches or nectarines, peeled, seeded, grilled, cooled and sliced into chunks
- 5 ounces baby arugula
- 2 ounces crumbled goat cheese
For the Dressing
- 1/2 cup fresh orange juice
- 1/4 cup balsamic vinegar
- 1/4 teaspoon unrefined sea salt
- Fresh ground black pepper
- 2 teaspoons fresh thyme
- 1/2 cup olive oil
Scrub the beets. Place in a roasting pan, toss them in a generous dash of olive oil. Roast them at 350′ for about 35 minutes or until you can easily insert a knife tip into the largest one. Put the beets in a zip lock bag and place them in the refrigerator. Once cool, the skins will slide right off.
I grilled the peaches for a few minutes to intensify the flavor. I chilled them before assembling the salad.
Combine the dressing ingredients in a jar. Shake well, and refrigerate.
To plate the salad: Arrange the arugula, beets, peaches on a serving plate. Add the diced onions. Garnish with the crumbled goat cheese a sprig of rosemary. Drizzle with the dressing.
Sautéed Green Beans, Laura’s Way!
Green beans have been a part of summer my entire life. My grandpa grew them, my mom grew them and I continue to grow them today. I remember one summer driving with my mom, cross country for one of their West Coast to East Coast moves. Every dinner, for two weeks, was served with green beans! I’ll never forget the look on the server’s face at the restaurant in Springfield, MO, when I let out a big “OH NO” after asking her what the vegetable of the day was! We explained our situation, and we all had a good laugh!
Sauté a diced, sweet onion in a good amount of olive oil in a large sauté pan, that has a lid. Add a desired amount of diced bacon (or not) and cook most of the way done. Add the beans. I had a combination of wax beans and Royal Burgundy purple beans (they turn green when they cook). Saute about 5 minutes. Add about 3/4 cup of DRY VERMOUTH. Yup – an old restaurant trick. Bring to a slow simmer, cover, and steam about 20 minutes. Season with salt and pepper and fresh dill.
Garden Fresh Bruschetta
One of our favorite summertime treats is straight from the garden bruschetta. Diced tomatoes, finely chopped garlic and fresh sliced basil, all tossed with the best olive oil and placed on a toasted slice of baguette! YUMM! We had some fresh mozzarella on hand, so I added a pinch to each, glorious serving.
Half Sour Pickles
I absolutely LOVE the fresh, bright green pickles that are served “all you can eat” style at any good deli! I had no idea how simple they were to make! Thanks to a very productive pickling cucumber plant, I now have my own jar of half sours, bubbling away in my refrigerator. I found the recipe in The Victory Garden cookbook.
Ingredients
12 pickling cucumbers, about 3-4″
4-5 cloves of garlic (original recipe calls for 1)
6-8 sprigs fresh dill
1/2 teaspoon dill seeds
1 tablespoon pickling spices
1/4 cup kosher salt
1/4 cup white vinegar
2 1/2 quarts of water
Thoroughly clean the cucumbers. Halve or quarter them. Wash the dill. Peel and flatten the garlic. Pack the cucumbers, dill, garlic, dill seed and pickling spice in a large glass jar, a pickle crock or a big glass bowl. You will want to make sure the pickles will be covered with at least two inches of the water.
Bring the salt and the water to a boil. Boil a full two minutes. Pour the brine over the cukes. Cover the jar with cheesecloth and secure it with a rubber band. Let the pickles sit on your counter for 2-3 days. The brine will get cloudy as fermentation occurs. Once fermented to your taste, add the 1/4 of vinegar, cover and refrigerate. They will keep forever under refrigeration, but believe me, they won’t last that long!
Raspberry Jam
I am not quite sure what motivated me to purchase a flat of raspberries at the farmers market, with everything else going on! I do have raspberries in the garden, but only enough to add to my morning yogurt or smoothy each day. You can see, they were hard to resist. I love using raspberry jam in my thumbprint cookies at Christmas. This year, they will be extra special 100% home made!
Raspberry Jam*
I used 6 pints of fresh raspberries, about 4 cups of sugar, and the juice of one lemon. I mashed the berries a bit with a potato masher. I cooked the berries, sugar and lemon juice to a temperature of 220′, per my candy thermometer. I processed the jam in 12 1/2 pint jars, for about 20 minutes. It is absolutely delicious!
*Note – there are 100’s of fabulous step by step instructions on the internet, for canning jams. I was in a hurry and did not shoot the entire process, just the final product. It is fun and easy and I encourage you to give it a try with your favorite fruit or berry!


